Showing posts with label party. Show all posts

Wednesday, March 5, 2014

Party Game Ideas: Pictionary

A huge hit at our recent kids gatherings has been playing our own version of "Pictionary". While we have the Disney Pictionary version, it is better for a small group of 2-4 people. I was inspired by the old "Win, Lose, or Draw" Game Show (which has just been rebooted on Disney Channel) and the new "Hollywood Game Night" to turn the game into a party game.
Disclaimer: I am an iTunes Associate and Amazon Affiliate and am compensated for sales through iTunes and Amazon links. I appreciate your support of my blog by shopping through my links.
My initial thought was to use the white board on my daughter's easel as our drawing medium. Then I had the brainstorm of using our AppleTV and an iPad through Air Play. Unfortunately, I have a first generation iPad which is not compatible with Air Play and my phone isn't very large as a drawing surface. My husband has an iPad2 and has let us use it for the game, even when he has been at work. We use the Penultimate a free app from Evernote and a Stylus to make drawing easier. If you are more of an Android based household, you may be able to accomplish the same thing with Google Chromecast HDMI Streaming Media Player.
Jungle Cruise Clue from our DisneySide Party
The benefit of making our own game is that I can create my own word list to fit any party theme. I type my word lists on the computer in a larger font than normal (i.e. Arial 18 pt) with extra line spacing. I usually print them on standard paper and fold them in a bowl. You could also use heavier card stock and place the cards in a pile.

Mr Potato Head Clue from DisneySide Party
The game has proven to be hugely popular among my daughter's friends. The kids who have attended multiple parties have asked if we will be playing it each time we have a party.

I have an interesting story for playing with a pre-reader. My niece is just starting to read and asked for help reading her word "Star", so I whispered it in her ear and she started drawing. I was more and more puzzled as she seemed to be drawing a race. Finally I asked her to whisper what she was drawing. She thought I had told her "Start". I have to say it was an amazing approach for a Kindergartener to take to a fairly difficult word to draw.

When designing my word lists, I try to include a wide variety of words and phrases. I want to allow kids of all ages to participate (I had kids from ages 3.5-8 plus adults at my daughter's family birthday) as well as those not familiar with the party theme.


Sunday, February 9, 2014

Star Wars Party: Princess Leia Pizza Roll Buns

When I think of Star Wars food perhaps the most iconic image is Princess Leia's "cinnamon roll" hair buns. I definitely wanted to incorporate them into the menu for my daughter's Star Wars birthday party. However, since we were already having birthday cake and brownies, I needed a lunch option. Instead of a sweet cinnamon roll, we decided to make pizza roll hair buns.

I kept the recipe simple by using a refrigerated Pillsbury Pizza Crust and jarred pizza sauce.

I started by spreading the crust out on a cookie sheet.
I then added sauce and my toppings. When adding the sauce leave 1/4-1/2" sauce-free section at one of the narrow ends to allow you to secure the end of the roll. For our toppings, we chose onions, peppers, and diced pepperoni. You can add whatever toppings you prefer. Diced toppings do work better than strips or large chunks.

Add your cheese and then start at the narrow end and roll your pizza up. Wrap the roll in plastic wrap and place in the freezer.


When you are ready to bake them, preheat the oven to 375F. If the rolls are frozen solid, allow them to warm up for 10-15 minutes before trying to cut them. Slice them in 1/2" thick sections and place on a non-stick mat (I used a Silpat Non-Stick Baking Mat) or parchment paper. Bake for 13-15 minutes or until the dough is golden and the cheese is melted.


The pictures above are from the test round that I made. For her actual birthday party, we made 4 varieties:
  • Cheese
  • Cheese & Pepperoni
  • Cheese, Pepperoni, Onions, & Peppers
  • BBQ Chicken (using BBQ sauce instead of tomato sauce) with onions and peppers
I was really happy with how they turned out. They were a nice way to incorporate the idea of Princess Leia's hair buns into an entree. Beyond the party, my daughter loved them, so I think we will make pizza rolls again even for a non-Star Wars theme party.


Saturday, February 8, 2014

Star Wars Light Saber Cake

My daughter wanted a Star Wars birthday party. Even though she likes brownies and not cake, she always wants a decorated cake as well as her brownies. So, I am usually perfectly content to buy a store bought cake since I know that I'll be making her brownies anyway. When we browsed the cakes at our local stores, the Star Wars themed cakes were mostly The Clone Wars themed which she was ver clear that she did not want.

One idea that I had was an R2-D2 cake. My mom had made my brother one in the early 80s. You start with a 13x9 cake and round the corners of one short end to make the dome and use those for feet at the bottom. Frost in white icing and add decorations (mostly blue), to match R2-D2
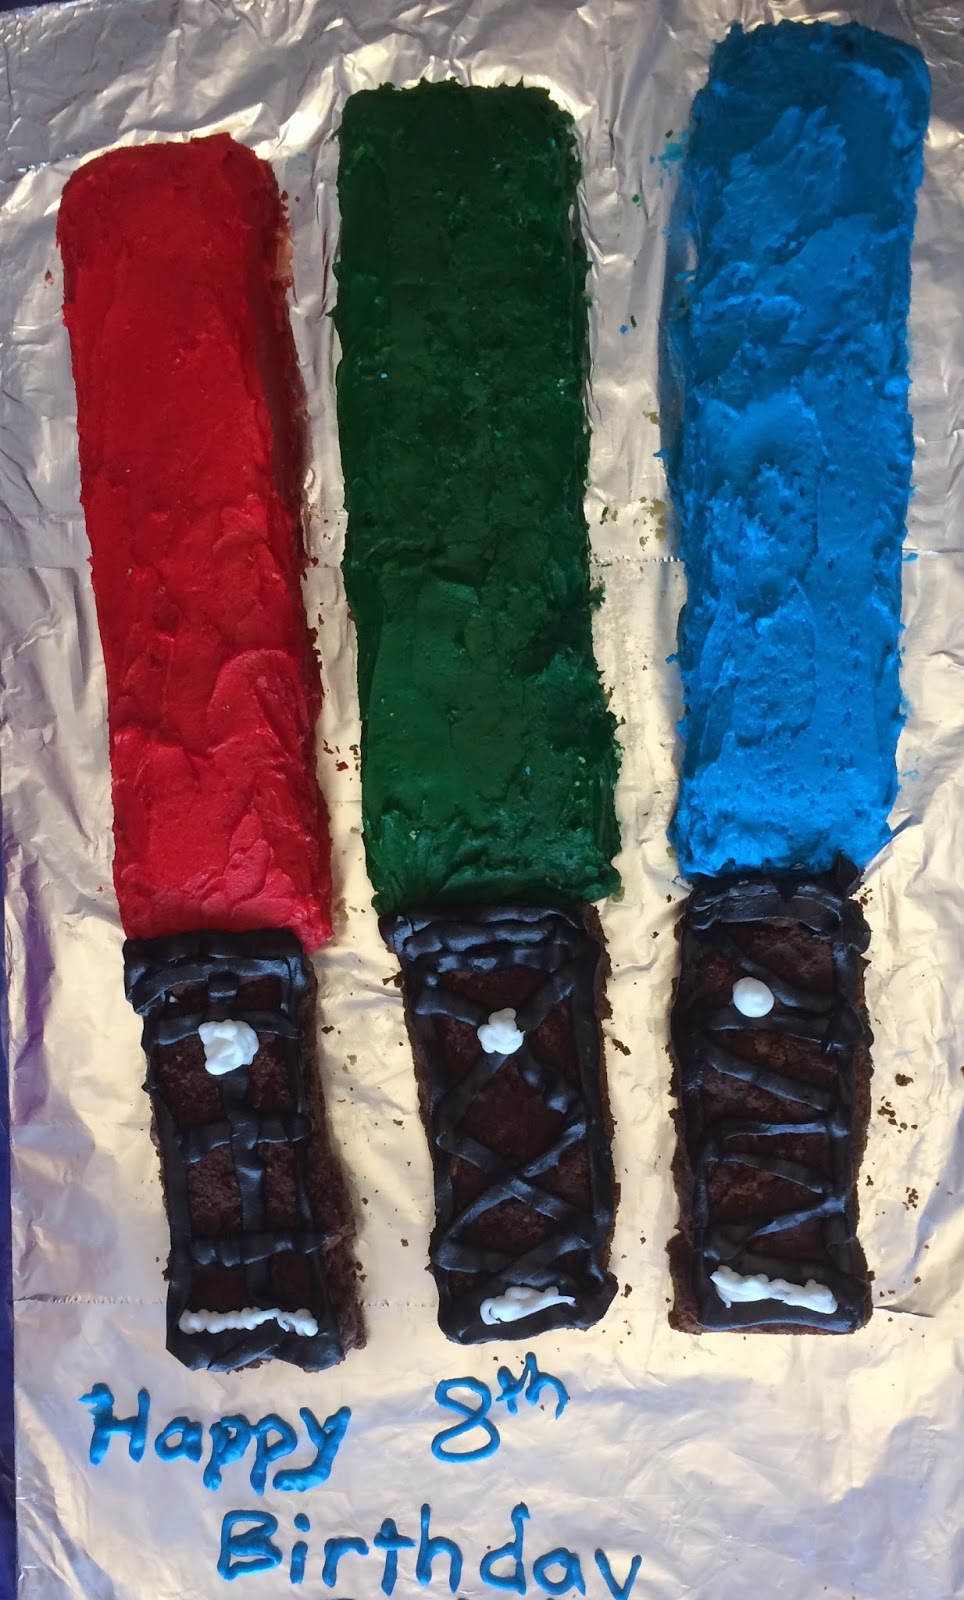
However, when I searched Pinterest, I found Light Saber Cakes. I was intrigued. Even better, I could combine my daughter's requested brownies into the cake as the handles for the lightsabers.

To start, I baked a 13x9 sheet cake and a 9x9 brownies. I used a box cake mix for the cake and my homemade brownie recipe. When making your brownies, make sure you use a recipe that is sized for a 9x9 pan. I used my 13x9 recipe and it did not bake well in the 9x9 pan. Next time, I would either use a box mix for a 9x9 pan or make a 13x9 pan and not use all of the brownies in the light sabers.

Once your cake and brownies are baked, allow them to cool completely. Select your light saber colors (my daughter chose red, blue, and green). I asked about a purple for Mace Windu, but she wanted the red, blue, and green.

Slide your 13x9 cake into 3 strips that are 13" long and approximately 3" wide each. These will be the blades of your light sabers. Slice the brownies into 3 strips that are 3" wide and 9" long. These will be the hilts of the lightsabers.

You will need to find a long board to hold your cakes (each light saber is ~22" long). I have a panel scrap from our family room built in that is the perfect length. I cover it in wax paper and two layers of foil. You could also use sturdy cardboard as your base.

Prepare your icing. I used homemade buttercream icing following the Domino Sugar recipe (made a batch and a half). However, any white based icing including store-bought would work. I split my icing into 3 equal amounts (light saber blades) and two smaller amounts (black and white). To dye my icing, I purchased the Wilton gel colors in red, green, and black. I used standard food coloring for the blue. The gel coloring will allow you to obtain more vibrant colors without using so much food coloring that you alter the taste and consistency of your icing. (Tip: Use the black very sparingly.)

Frost each cake section (tip: Freeze the cake sections for up to 30 minutes to reduce crumbling of the cut edges as you ice them). I find it easiest to frost one side and the top before placing them in position on the board. For the two that have a non-cut edge, I find it easiest for this to be the last side to frost as it does not crumble as much.

Place the brownies on the board. Use a small amount of icing under the brownie to anchor them in place. When I looked at my daughter's light sabers I noticed they all had different designs on the hilt, so I used a variety of Xs, stripes, etc in black. I also used a little bit of white at the base and to form the button.

Finally, I added "Happy 8th Birthday" in icing writing on the board below the light sabers. Trust me, this is why you want your brownies anchored...I didn't anchor them with icing and they slid into my writing as soon as I moved the cake. Fortunately I moved it right away and still had icing to redo the writing.

The cake was a big hit! The kids who prefer cake got cake, those who preferred brownies got brownies. With 13 kids and some parents, the cake was almost completely gone. It is a good thing that I had both the cake and brownie. Having the cake width already cut in thirds, it was very easy to cut the cake at the party.

Monday, September 9, 2013

Easy Carnival Games for Kids

This afternoon we were at our church picnic. For the last several years, I have been in charge of the kids games. We want our games to be individual games that can easily be adapted for kids in a wide age range. Our games are free and our goal is to have the kids all walk away with a prize.

Anytime you are running carnival games, you can either give prizes at each game or give tickets that can be combined at a prize table. While the prize table allows you to have nicer prizes, it also requires additional volunteers and additional effort in distributing prizes across various ticket ranges. For simplicity, we have decided to offer a prize for each game.

By far, the most popular game today was Block Balancing. I developed the game 2 years ago by adapting it from one that I found on the Minute to Win It website. Rather than set a time limit, I set a tower height for the kids to achieve.
Block Balancing - Paper/Plastic plate, letter blocks - Kids balance the plate on their fingertips and try to stack the blocks on it. I used my daughter's wooden letter blocks (~1" diameter). I had candy as the prize and gave kids 1 piece for 5 blocks and 2 pieces for 10 blocks. This works best when you can setup at a table so the next blocks are easily accessible. 
The kids could not stay away from this game. There were some kids I saw at this table for most of the afternoon. They didn't even care about the candy, it was definitely trying to beat their own record or their friends. We had 48 blocks and 4 plates, so several kids could play at the same time.

Another popular game is the pencil drop which is a game that my parents used to have us play at birthday parties when I was young.
Pencil Drop - Stool, Water bottle, pencils - Kids stand on the stool, hold a pencil waist high and try to drop it into the bottle. Smaller kids don't need to stand on the stool. They win the pencil as a prize. 
The Pencil Drop project is easily transitioned to match your party theme. By swapping the type of pencils and decorating your container, you can have a game that matches any theme.

When I was searching for prizes, I found foam gliders. I decided to incorporate the glider into the game.
Airplane Flight - Hula Hoop, Rope, Tree, Gliders - Hang the Hula Hoop from a tree branch (or other post) and assemble gliders. The goal is to fly your glider through the hoop. You can either let them keep the glider they use, or give them an unassembled glider and keep a few assembled ones for use. If you have the room, you can use two hoops at different heights for different ages.
When I took over the games, I was provided with the materials for three games:
Duck Pond - Plastic sided pool and 24 rubber ducks. Fill the pool about 1/2 way with water and float the ducks. You have a few options for numbering your ducks: individual numbers, equally distributed numbers (i.e.. 8 each of 1, 2, and 3), or the rare number (ie 15 1s, 6-2s, and 3-3s). Our ducks were already equally distributed as 1, 2, or 3. With the rare number method, you could have a better prize for the rare number. Personally, I am not a fan of the individual numbers as you would need to many prizes.

Treasure Chest - Treasure chest, play sand, pennies, fish net. Our treasure chest is a cooler that has been painted to resemble a pirate's chest. Hide pennies in the sand and have the kids take a scoop with a fish net or a plastic container with holes poked in the bottom. The kids can keep the pennies. You can also add a few larger denomination coins or fake coins that are traded for a prize. You could use fake coins as the prize, but I have found that pennies are considerably cheaper.

Bean Bag Toss - Bean bags, 3 pails. Kids stand at a distance and try to toss the bean bags into the pails. Adjust the starting line for younger kids to be closer. You can give additional or larger prizes for multiple pails. We found taping the pails together kept them from tipping as easily.
Also, we provide a craft area. The crafts are fairly simple, but my favorite craft for a carnival style party is:
Paper Bag Decorating - plain brown lunch bags, crayons, markers, stickers, and stamps. Let the kids decorate a bag. You can use the fancy colored bags, but they are typically coated and crayons, markers, and stamps will not work as well. 
Trust me, the parents who are tasked with holding their kids winnings will thank you for the bags.

I also learned the hard way that small foam stickers are not a great choice for outside because the backings blow away. When we do have activities that generate trash, I have found that a plastic container with a lid is a great temporary trash can.

This year we did Face Painting since there were volunteers who wanted to face paint. In previous years, we have used temporary tattoos since they are quick and easy. We are still using the extra temporary tattoos as game prizes.

Disclaimer: I am an Amazon Associate and am compensated for sales through Amazon links. I appreciate your support of my blog by shopping through my links.

Monday, May 13, 2013

Monsters University Activity Sheets

We have been looking forward to Monsters University ever since it was announced (personally, the Pixar sequel I am waiting for is Incredibles 2 - although I haven't seen any announcements).

Walt Disney Animation Studios has released two Monsters University Activity Sheets:
These activities would be great for a Monsters themed movie birthday party.

More information on Monsters University:
Ever since college-bound Mike Wazowski (voice of Billy Crystal) was a little monster, he has dreamed of becoming a Scarer—and he knows better than anyone that the best Scarers come from Monsters University (MU). But during his first semester at MU, Mike’s plans are derailed when he crosses paths with hotshot James P. Sullivan, “Sulley” (voice of John Goodman), a natural-born Scarer. The pair’s out-of-control competitive spirit gets them both kicked out of the University’s elite Scare Program. To make matters worse, they realize they will have to work together, along with an odd bunch of misfit monsters, if they ever hope to make things right. Screaming with laughter and oozing with heart, Disney•Pixar’s “Monsters University” is directed by Dan Scanlon (“Cars,” “Mater and the Ghostlight,” “Tracy”), produced by Kori Rae (“Up,” “The Incredibles,” “Monsters, Inc.”) and features music from future Rock and Roll Hall of Fame inductee and award-winning composer Randy Newman (“Monsters, Inc.,” “Toy Story 3”). For more information, like us at facebook.com/PixarMonstersUniversity, and follow us on twitter.com/disneypixar. The film opens in U.S. theaters on June 21, 2013, and will be shown in 3D in select theaters. For more information, check out disney.com/MonstersU.

Some trivia on the movie:
  • “Monsters, Inc.,” originally released on November 2, 2001, was nominated for four Oscars®: Best Animated Feature Film, Best Original Score, Best Sound Editing and Best Original Song—“If I Didn’t Have You,” for which it won. 
  • “Monsters University” will hit U.S. theaters nearly 12 years after the original “Monsters, Inc.” theatrical debut.
  • Billy Crystal is known worldwide for his film roles in “When Harry Met Sally…,” “City Slickers,” “The Princess Bride” and “Analyze This”; his 2005 Tony®-winning Broadway show, “700 Sundays”; as a cast member of “Saturday Night Live”; and as the nine-time host of the Academy Awards® ceremonies.
  • John Goodman’s current film projects include Ben Affleck’s drama “Argo,” which premiered at the 2012 Toronto Film Festival; the Robert Zemeckis thriller “Flight,” which premiered as the closing-night film at the New York Film Festival; and Clint Eastwood’s sports drama “Trouble with the Curve.”
  • Helen Mirren won international recognition for her work on stage, screen and television. For her portrayal of Queen Elizabeth II in 2006’s “The Queen,” she received an Academy Award®, Golden Globe, Screen Actors Guild (SAG) Award® and BAFTA Award for best actress. She was also named best actress by a multitude of critic’s organizations from Los Angeles to London.
  • Oscar®- Grammy®- and Emmy®-winning composer/songwriter Randy Newman contributes his unique musical talents to his seventh Disney•Pixar film. The 20-time Oscar nominee’s wins include “If I Didn’t Have You” for “Monsters, Inc.” and “We Belong Together” for “Toy Story 3.” He will be inducted into the Rock and Roll Hall of Fame in April 2013.

Disclaimer: I was provided with the attached activity sheets and movie information by Walt Disney Studios. I have not been compensated for sharing this information.


Monday, October 8, 2012

Star Wars Crafts

Build a Droid
This weekend my daughter and I attended Star Wars Reads Day at our local library. During the event they had lots of Star Wars books out for reading and a number of crafts. Many of these activities would be great activities for a Star Wars Birthday Party.

My daughter's favorite activity was "Build a Droid". Kids had the opportunity to use scrap materials to make a droid. She used a toilet paper roll covered with a purple silk ribbon to form the base of her robot. We used scrap cardboard and caps to make feet. The head was created with an upside down condiment cup with more purple ribbons making hair. After adding the hair, she declared her creation to be R2-D2's girlfriend.

This would be a great craft for a Star Wars birthday party. Other materials that they had on hand included egg cartons, cardboard shoe inserts, double sided foam stickers, etc. Our town has a store called The Scrap Box that collects unused/scrap materials from manufacturers and businesses. They offer birthday parties, field trips, and also sell their materials for projects.

Many of the printables that they used at the event can be found in the PDF that is provided on the Star Wars Reads website in both Color and Black & White. The PDF also includes some options for food.

The library also had paper crafts based on the Star Wars LEGO figures. My daughter really enjoyed "putting them together". Except it was me doing the painstaking cutting, slicing for slots, and doing the actual assembly. These would be a better activity for an older audience (4th grade & up maybe) who could actually do the cutting and folding. I could not find the exact craft that we did, but the Star Wars website has quite a few templates that can be printed to create LEGO paper figures and ships.

Sunday, March 21, 2010

Easter - Group Egg Hunt

My playgroup is having an Easter party on Friday, so I am starting to plan activities. I am planning an egg hunt as one activity. I am hoping that the weather will be nice and we can do it outside. I usually fill the eggs with treats. If I am using food treats, I make sure to wash the eggs in soapy water and leave plenty of time for them to dry before filling them.

Since our playgroup is mixed ages (15 mos-4 yrs), I need to have eggs with treats appropriate for different ages and also some eggs at different hunt difficulties. A great tip that I am going to use is to color code the eggs, reserving one color for the youngest children.

Food Treat ideas include:

  • Cheerios
  • Raisins
  • Goldfish
  • Gerber Puffs
  • Jelly Beans
  • M&Ms
  • Hershey Kisses

Non Food Treat ideas include:


Each year after a holiday, I keep my eyes open for clearance sales on holiday merchandise to stash away for next year. However, last year's Easter purchases were eggs and craft supplies so I don't have any treats to use. I wish I would have thought of it earlier so I could order some treats.

For a craft project, we are going to decorate bags to use in our egg hunt. I have foam stickers that I bought on clearance last year and also have paper bags left from Valentine's Day.

See other posts on Easter.

Sunday, February 28, 2010

Pump It Up Birthday Party

Yesterday we attended a birthday party at Pump It Up. We had 75 minutes of jumping time in a large room with 4 large inflatables - a large slide, an obstacle course, a basketball court, and a round room with a big pillow. This was followed by 45 minutes in the party room with pizza, fruit, sandwiches, cake, and presents. The parents brought in the fruit, sandwiches, and cake, Pump It Up provided the pizza from a local place. Pump It Up is primarily for parties however our local location does have occasional pop in play times.

The 45 minute time line for lunch, cake, and presents was a bit tight. By having the party at a non-meal time, the time would be more leisurely. The party room had an inflated throne for the birthday child to sit on to blow out their candles and open the presents. The throne was great for present opening because it raised the birthday child up so everyone could see presents be opened and it kept back some of the throng of kids trying to help and see all the presents up close.

Either I have the only 4 year old who hates inflatables, or am the only one who will take her to a party with them when she hates them. All of the other kids seemed to have a good time on the inflatables. I was jealous, I wanted to have fun with them, but my child would not go on them. I did kind of force her through the obstacle course after which she said that it was fun, but that she had "had enough fun for today". She then asked me to come back another day. I tried making a deal with her that if she tried each of the inflatables that we could come back, but she would not agree. Finally, I carried her 2/3 of the way up the stairs for the slide and made her go the rest of the way and slide down. Again, she said she had fun, but would not go again.

It is so frustrating that she does not like inflatables and indoor playgrounds. It makes it hard to get through the winter when we live in Michigan and there are lots of indoor playgrounds and bounce places.

Final review, most of the kids had fun at the party. It was well organized by the staff. However, it likely won't be something we plan due to my daughter's dislike of most of the places that offer parties.

Monday, February 15, 2010

Valentine's Party Success

Yesterday, my daughter had a Valentine's Day party with 10 friends. As usual, her toys proved to be a big hit among the kids with some selecting to just play with her toys instead of participating in the games.

I started the party by having each child decorate a bag with stickers, stamps, and markers. This gave them an activity to do as everyone arrived and also gave them a place to store any prizes they won in the games.

The first game we had was a treasure hunt. I hid a box of ring pops in the oven of my daughter's play kitchen. I had glued clues to red hearts that took them from one place to another across the basement. Sending them to generic items (table, pillow, oven, easel) worked much better than a specific toy (Handy Manny workbench or Tigger & Pooh Changing Tree) as not all kids were familiar with the characters. We played as a group with the kids all looking for the clue together. As they found each clue, I gave out a small prize to each child (eraser, pencil, bracelet, stickers, etc). They all received a ring pop when they found the "treasure".

Another successful game, was my Valentine's version of Hullabaloo. We had 26 pads with a mix of red, white, purple, and pink in circles, diamonds, and hearts with dessert, Valentine Pooh characters, and Princesses. There were 8-9 pads in each category to allow for many players. I wrote an AppleScript program to call the moves using a random number generator and the built-in text to speech converter. Unfortunately the volume on my laptop was not sufficient and I ended up having to re-announce the calls. For the pads, I printed the pictures on white paper and glued them to heavy paper for the red and purple. At the last minute, I realized I did not have pink paper, so we colored the white background pink. For the white and pink, we covered them front and back with contact paper to make them more durable. I will definitely keep this game in mind to adapt for future party themes.

The kids loved decorating their own cupcakes. I served each child a cupcake on a plate and then we gave them a blob of icing in their choice of color (red, white, or pink) and various toppings (marshmallows, Hershey Kiss, chocolate chips, sprinkles, etc) on their plates. Next time, I think I would make the plates ahead of time with a variety of toppings or at least the icing.

Pin the heart on the bear was successful as well with most children choosing to participate. I was afraid we were not going to be able to do this since I had forgotten to purchase poster board. But, I had 2 sheets of brown 12x20" construction paper that I was able to use to make a decent bear. I used red construction paper to make the hearts.

We had toss the bear into the bucket and drop the pencil into the popcorn box. A few children played these games, but most were too busy playing.

I also had necklaces for them to make. A few children made the necklaces - ranging from 3 beads to a fully beaded necklace. I had bought glittery plastic lacing so they still looked pretty even with only a few beads.

The kids also had a great time playing with balloons and bouncing them around. I found that the shower stall in my basement is a great place to stash the balloons until it is time to play with them.

Sunday, February 7, 2010

Beginning Valentine's Day Party Planning

A few days ago my 4 year old daughter finally convinced me to let her have a Valentine's Day party. So we now have 1 week to plan the party - games, crafts, and food. To keep the party planning expenses down, I limited the guest list to 11 kids and opted for an afternoon party so we don't have to provide a meal.

Now we are in the midst of planning crafts and games. I have found that my four year old has a great imagination when it comes to games. For her winter themed birthday party, she came up with pin the nose on the snowman. Likewise she is planning games for this party.

Crafts:
Heart Necklaces: At JoAnn Fabric I found red heart beads (65 for $0.99). I bought those and a large bag of white beads (720 for 3.99) for the kids to make necklaces. I also bought 10 yards of plastic glitter Craft Lace ($0.79). I figure we will not use all of the white beads or the lacing and they can be saved for future crafts. Next time, I am going to plan the party in advance to wait for a sale.

Bag Decorating: We are going to decorate bags for goodies and Valentine's. I have foam stickers which I bought at Michael's for our play group party and should have some left. I bought a large box of 1000 stickers for $1.99 at Party City. My daughter also has heart and flower stamps, markers, and crayons. I am hoping to find white lunch bags to decorate or we will just decorate the brown ones. The only white ones I have found so far are the coated bags which will not be as easy to stamp or draw on.

Cookie or Cupcake Decorating: We are going to decorate either cookies or cupcakes which the kids can take home or eat at the party. I will dye icing in red and pink (and leave some white). I will probably dye coconut. We have flavored mini-marshmallows in various colors and chocolate chips. I would like to have M&Ms but may not because two children have peanut allergies.

Games:
With preschoolers, I prefer to have games where everyone is a winner or we just do it for fun. That way everyone gets a prize.

Pencil Drop: This was a staple in my house growing up. My parents had this plastic milk jug that they bought me for my 2nd Christmas when I was 13 mos old. It had the perfect size opening for dropping pencils in (about 2" in diameter) and the neck kept them from popping out. The kids then get to keep the pencil. I was probably 18 and it was still being used for my little sister's parties. The great thing is that as the kids get older (& taller) it gets harder because they are dropping it further. Unfortunately, the plastic jug is no longer around. For Halloween, I used a larger container that I had and made a pipe cleaner spiderweb to make it a little harder (and a washcloth to make the bottom less bouncy). Still thinking of a good way to do this for Valentine's Day.

Pin the Hearts on the Bear: My daughter has a pink stuffed bear with hearts on its tummy. She wants to do pin the hearts on the bear. I am thinking of making a pink bear out of poster board and cutting out hearts for the kids to pin on. Unfortunately, I am not super artistic, so hopefully I can make the bear look halfway decent.

Kissing Booth: (No, not that kind) My daughter has a market that we turned into a haunted house toss for Halloween and she wants to do something with it. I think we will cut out lip shaped disks and have the kids toss them through a decorated market. I bought a bag of Hershey Kisses to use as prizes.

Valentine's Hullabaloo: I need one active game for the kids. This is based on the Hullabaloo game from Cranium. The game has pads in different shapes and colors with pictures on them. Then it tells the kids to go to a different color, shape, or picture theme until finally declaring whoever is on a particular pad the winner. We are designing our own Valentine's themed game. We are going to use red, pink, white, and purple paper to make the pads and cover them in contact paper for durability. We will use a heart as one of the shapes. I have found Valentine's ClipArt that we are going to print on the different pads. I am using food (Hershey Kiss, Heart Lollipops, Box of Chocolates, etc), Characters, and one other still to be determined category. I am debating the calling mechanism. I think I'll just record myself saying different options and randomize it on my iPod. ("Hop to a Heart", "Twirl to a Red", "Grab some food") I will include some that say at the end "ie Hop to a Heart......Freeze. Whoever is on XXX is the winner" where XXX is one of the pictures on a heart. My other option is to make a deck of cards some of which list winners and others which don't. If I am really ambitious, maybe I'll polish up my old programming skills and write a program to do this. (You probably need to know how to play Hullabaloo for this to make sense).

Bucket Toss: I may have the kids toss a small stuffed heart into a bucket for a prize.


Well, I think that is plenty to have the kids entertained for two hours.

Thursday, February 4, 2010

Party Monster

Yes, I've created a party monster. My daughter LOVES parties. She had a Halloween Festival and a Christmas themed birthday party. Now she is insisting on a Valentine's Day Party. Being the softie mom that I am (and a fan of parties), I have agreed. We are doing this party simpler than others in the past - no lunch, just dessert.

I truly have a party girl on my hands, hope she does not get too wild as she gets older. Not only does she want the Valentine's Day Party with her friends, she also wants to have one for her toys and hand sanitizers (My mother in law gave her 5 different Bath & Body Works sanitizers for Christmas and my daughter treats them as dolls).

I have enlisted my 4 year old to help me plan games. She is pretty good at coming up with games. I'll definitely blog more as we further refine them, hopefully with some pictures.

Game ideas:
+Pin the kiss on the teddy bear
+Throw an arrow through the heart.
+Pencil drop

Craft ideas:
+Cupcake decorating
+Decorating bags to hold Valentine's (stamps, crayons, markers, and foam heart stickers

Saturday, January 16, 2010

"Christmas" Birthday Party

My daughter wanted a Christmas themed party for her 4th birthday. Since her birthday is the first week of January, we agreed, but focused it more on winter than Christmas. One benefit to the theme was that I did not have to get the Christmas decorations put away before her party.

The kids had a snowball fight. While we live in Michigan, there was not snow the day of her party. We spread tissue paper sheets out around the basement and let the kids crumple them up and throw them around. They had a blast. When they were done, I bagged the paper to reuse in wrapping my Christmas decorations. The following week when I took down the Christmas tree, I found a "snowball" hidden among the branches. I cannot take credit for this activity. We did it last year at a friend's birthday party.

I asked my daughter what games she wanted to play and she asked to play "Pin the Carrot Nose on the Snowman". I made a snowman out of a sheet of white poster with some black and orange construction paper. To make the snowman, I found three bowls/pans of varying sizes in my kitchen that could be laid out on the poster and cut out the three circles which I glued together as a snowman. I used black construction paper to make a hat and cut small black circles for the eyes, to make a mouth, and as buttons. I did not make these perfect circles so that they looked like lumps of coal. I made a bow with red construction paper. I cut two carrots for each child out of orange construction paper.

We played Snowman, Snowman, Penguin, a variation on Duck, Duck, Goose. The children sit in a circle and one child who is "it" goes around patting them on the head saying Snowman and eventually says Penguin. The child who is tapped as Penguin has to chase the child who was it as they run around the circle and sit back down in the penguin's seat. The penguin is then it.

I stocked up on party supplies at the post Christmas sales. At Michael's I bought a large package of foam stickers for $2.40. The package had trees, snowflakes, penguins, and snowballs. For each child, I cut a sheet of white construction paper into rolling hills and glued it at the bottom of a blue sheet of construction paper. The kids loved making their crafts and were creative in making their designs. The only down side of this was that Michael's had their sticker bin outside and it was 12 degrees the night I was there.

Finally, at Target I bought penguin melamine plates and shaky cups for each child. I found them on clearance after Christmas. The kids used them cups and plates for lunch and then I cleaned them and gave them to them as their party favors.

All of the kids seemed to have a great time. They did not want to leave, staying well beyond the time planned for the party. I think some if it had to do with having not seen each other over the holiday break.

Tuesday, October 27, 2009

Planning a Spooktacular Festival at Home

My 3.5 yr old is having a Spooktacular Festival at home for her friends. At this point we have 16 kids coming. With this number of kids we are setting up game and craft stations around the house and asking for help from the parents to man the station. With the kids mostly being 3, I wanted games where everyone can win and each person is playing on their own instead of competing. My prizes consist of pencils, necklaces, erasers, glow bracelets, bubbles, spider/bat rings, etc. I bought some of these last year at the Halloween clearance sales with the intent of doing a party this year.

Ghost Bowling: I took 10 empty disposable water bottles. I filled the bottle with about 2" of water and wrapped the bottom 3/4 in white tissue paper. Then I crumpled half a sheet of tissue paper and caught it in the middle of the other half with a rubber band. I drew a ghost face on each "ghost" and used the rubber band to fasten them to the top of the water bottles. You need to use a little water so the bottles do not tip when setup. Use more water to make the game more difficult. For older kids you could use a pumpkin as the bowling ball. We are using the orange basketball that came with my daughter's basketball hoop (Fisher Price Grow to Pro). If I get industrious, I may try to figure out how to attach a jack-o-lantern face that would not ruin the ball. Cost: $1.50 for half the pack of tissue paper.

From Halloween Crafts


Bucket Toss: At Dollar Tree I found a pumpkin and a ghost bucket for $1 each. Then, I found stuffed pumpkin, bat, spider, and ghosts in the dollar section at Target to throw in the buckets. Cost: $6, but all is reusable in the future or as decorations.


Witch Hat Ring Toss: I stuffed the point of a witch's hat with hand towels to make it stand up. I cut the center out of Halloween paper plates. Toss the ring around the hat. Cost: Free (I had the hat & had extra paper plates).


Haunted House Frisbee Toss: The paper plates I used had a ghost in the center, so when I cut the rings for the Witch toss I saved the center. My daughter has a play market which I covered with black tissue paper and black poster board. I used construction paper to create windows and doors. The kids can throw the frisbees between the posts. Cost: $2 for tissue and poster.

From Halloween Crafts


Friday, October 23, 2009

Halloween Party at regular playgroup

We had a Halloween Party today at our regular playgroup. The kids range in age from 2 months to 4 yrs old. We had potluck for various lunch and snack foods and most of the moms brought treats to hand out for a parade.

We started the playgroup as normal with the kids just playing, but many in costume. Then we had snack/lunch time (taking costumes off to protect them).

After eating, we made Lollipop Ghosts which were a hit for some, and some kids were more interested in eating the lollipops. Start with a spherical lollipop like a Dum-Dum or a Tootsie Pop (we used mini Tootsie Pops) and drape a white tissue over it to make a ghost. Mom or another helper then ties a string around the base of the lollipop to hold the tissue in place. I had black and orange cross stitch thread that worked great. Then the kids drew eyes and a mouth on their ghosts.

After the craft and cleaning up the toys, we had a treat parade. The moms with treats spread out around the room. We would have gone outside to spread out more, but it was pouring rain all day. One Mom had made bags up that had room in them, so we had the kids start with her to have a place to put their goodies. The kids all enjoyed getting their goodies. Some of the moms brought alternatives to chocolate including note pads, crayons, straws, spider rings, and skeletons.

The party was a nice low key way to incorporate Halloween into our regular playgroup meeting.

Related Posts Plugin for WordPress, Blogger...